const - JS | lectureAdvanced DOM and Events
DOM Traversing

In this lecture, we will learn how to traverse the DOM tree using JavaScript. And DOM traversing is basically walking through the DOM, which means we can select an element based on another element. And this is very important because sometimes, we need to select elements relative to another element. For example, a direct child, a direct parent element, or sometimes we don't even know the structure of the DOM at runtime. And in all these cases, we need DOM traversing.
As always, Before we start, go ahead and download the starter files from this link. Extract the files and open the index.html file in your browser. And you should see something like this.

We are going to work with the h1 element. And from there, we will go upwards, downwards, and sideways. So let's select the h1 element and store it in a variable called h1.
const h1 = document.querySelector('h1');Let's now start by going downwards ⏬. i.e., selecting child elements. The first way of doing this is to use querySelector because we already know that it works not only on the document but also on any element. If you take a look at the HTML, you will see that the h1 element has two span elements as children, each with the class highlight. So, let's select both of them.
const highlights = h1.querySelectorAll('.highlight');
console.log(highlights);
The querySelectorAll selects all the elements with the highlight class that are children of the h1 element. This will work no matter how deep these child elements are inside the h1 element. Also, note that if there were other elements with the highlight class on the page, they would not be selected because they are not children of the h1 element.
Sometimes, all we need are direct children. And for that, we can use the childNodes property.
const directChildren = h1.childNodes;
console.log(directChildren);
You can see that we get all kinds of stuff here. i.e., text, comment, span.highlight, etc. And that's because we already know that nodes can be anything. So this property really gives us every single node of every single type that exists. But many times, we are simply interested in the elements themselves. And for that, we can use the children property.
const elements = h1.children;
console.log(elements);
As you can see, we now have an HTMLCollection containing only the direct elements of the h1 element. And remember that an HTMLCollection is a live collection. So it's updated.
Finally, there are also the first and last element child properties. So, for example, let's say we want to change the color of the first element child of the h1 element. i.e., the first span element from the above HTMLCollection.
const firstElementChild = h1.firstElementChild;
firstElementChild.style.color = '#ff5722';
And we can do the same for the last element child.
const lastElementChild = h1.lastElementChild;
lastElementChild.style.color = '#ffc107';
Now, let's go upwards ⏫. i.e., selecting parents. Selecting direct parents is actually very straightforward. We can use the parentNode property.
const parentNode = h1.parentNode;
console.log(parentNode);
There is also the parentElement property which is usually the one we are interested in. In most cases, the parentNode and the parentElement are the same. The only difference comes when a node's parentNode is not an element. If so, parentElement is null.
const parentElement = h1.parentElement;
console.log(parentElement);
In case you need a parent who is not a direct parent, or in other words, you need to find a parent no matter how far it is in the DOM tree, you can use the closest method. This method takes a selector as an argument and returns the closest parent element that matches the selector. So, for example, let's say that on the page, we had multiple elements with the class header, and for some reason, we only wanted to select the one that is the parent of the h1 element.
As mentioned before, the closest method takes a selector as an argument. And this selector is the same as the one we use with querySelector, and querySelectorAll. Let's do that.
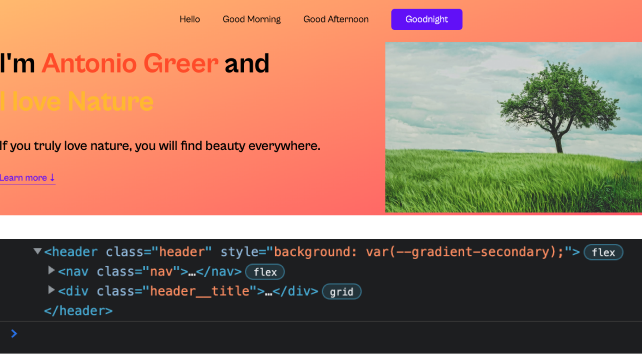
const h1ClosestParent = h1.closest('.header');
console.log(h1ClosestParent);

// Let's also change the background color
h1ClosestParent.style.background = 'var(--gradient-secondary)';
Let's now move sideways. i.e., selecting siblings. And for some reason, in JavaScript, we can only select direct siblings. That is, only the previous and the next one.
const previousElementSibling = h1.previousElementSibling;
const nextElementSibling = h1.nextElementSibling;

console.log(previousElementSibling);
console.log(nextElementSibling);
You can see that we get null for the previous element sibling since h1 is the first child element of the parent element with the class header__title. And we get h4 for the next element sibling since that's the element that comes right after h1.
Just like before, we also have the same properties for nodes. i.e., previousSibling and nextSibling.
h1.previousSibling;
h1.nextSibling;
If we really need all the siblings, we can use the parentElement property to select the parent element and then use the children property to select all the children of that parent element. And then, we can loop through all the children and select the ones that are not the h1 element.
const parent = h1.parentElement;

/**
 * 1 - Siblings are all the children of the parent element. So h1 is included.
 * 2 - Siblings is an HTMLCollection. So we need to convert it to an array.
 */
const siblings = parent.children;

console.log(parent);
console.log(siblings);

// Convert the HTMLCollection to an array, loop, apply the filter, and style the elements
[...siblings].forEach(function (siblingEl) {
  if (siblingEl !== h1) siblingEl.style.border = '3px dashed #5927AC';
});
You can now see that all the other sibling elements have a dashed border. Great! This was actually the fundamentals of DOM traversing. You can always check the MDN documentation for more information.