const - JS | lectureDOM & Events Fundamentals
Project III - The PIG GAME
In this lecture, we will start our third and last project on DOM and Events Fundamentals. This project will be the most exciting one because now we will take everything that we learned in the first two projects and build a really cool and amazing game called the pig game.

Credit to @jonasschmedtman
This project is going to be a practice project. That is a project where we will reinforce all the skills you have learned until this point. Because reinforcing knowledge is one of the most important things that you can do to learn.
So in this project, I won't get much into details as before, at least about the stuff that we already learned. Because, as I said, this is a practice project. To see how the game works, just click on this link. This is more of a real game now because we actually have two players.
The pig game is a simple dice game in which players take turns to roll a single dice as many times as they wish, adding all roll results to a running total but losing their gained score for the turn if they roll a 1.
To break down what I just said above, here is how the gameplay is structured:
- Each turn, a player repeatedly rolls a dice until either a 1 is rolled or the player decides to "hold":
- If the player rolls a 1, they score nothing and it becomes the next player's turn.
- If the player rolls any other number, it is added to their turn current, and the player's turn continues
- If a player chooses to "hold", their turn total is added to their score (The value below Player 1 and Player 2), and it becomes the next player's turn.
- The first player to score 100 or more points wins.
And just like in the previous game we built, you have a button (New Game) that allows you to reset the game. The dice disappears when you click on it, and all the scores are set back to zero.
Below is the game's flow chart (also present in the starter files) to help you better understand how the game works. It's a representation of everything that can happen in the application.
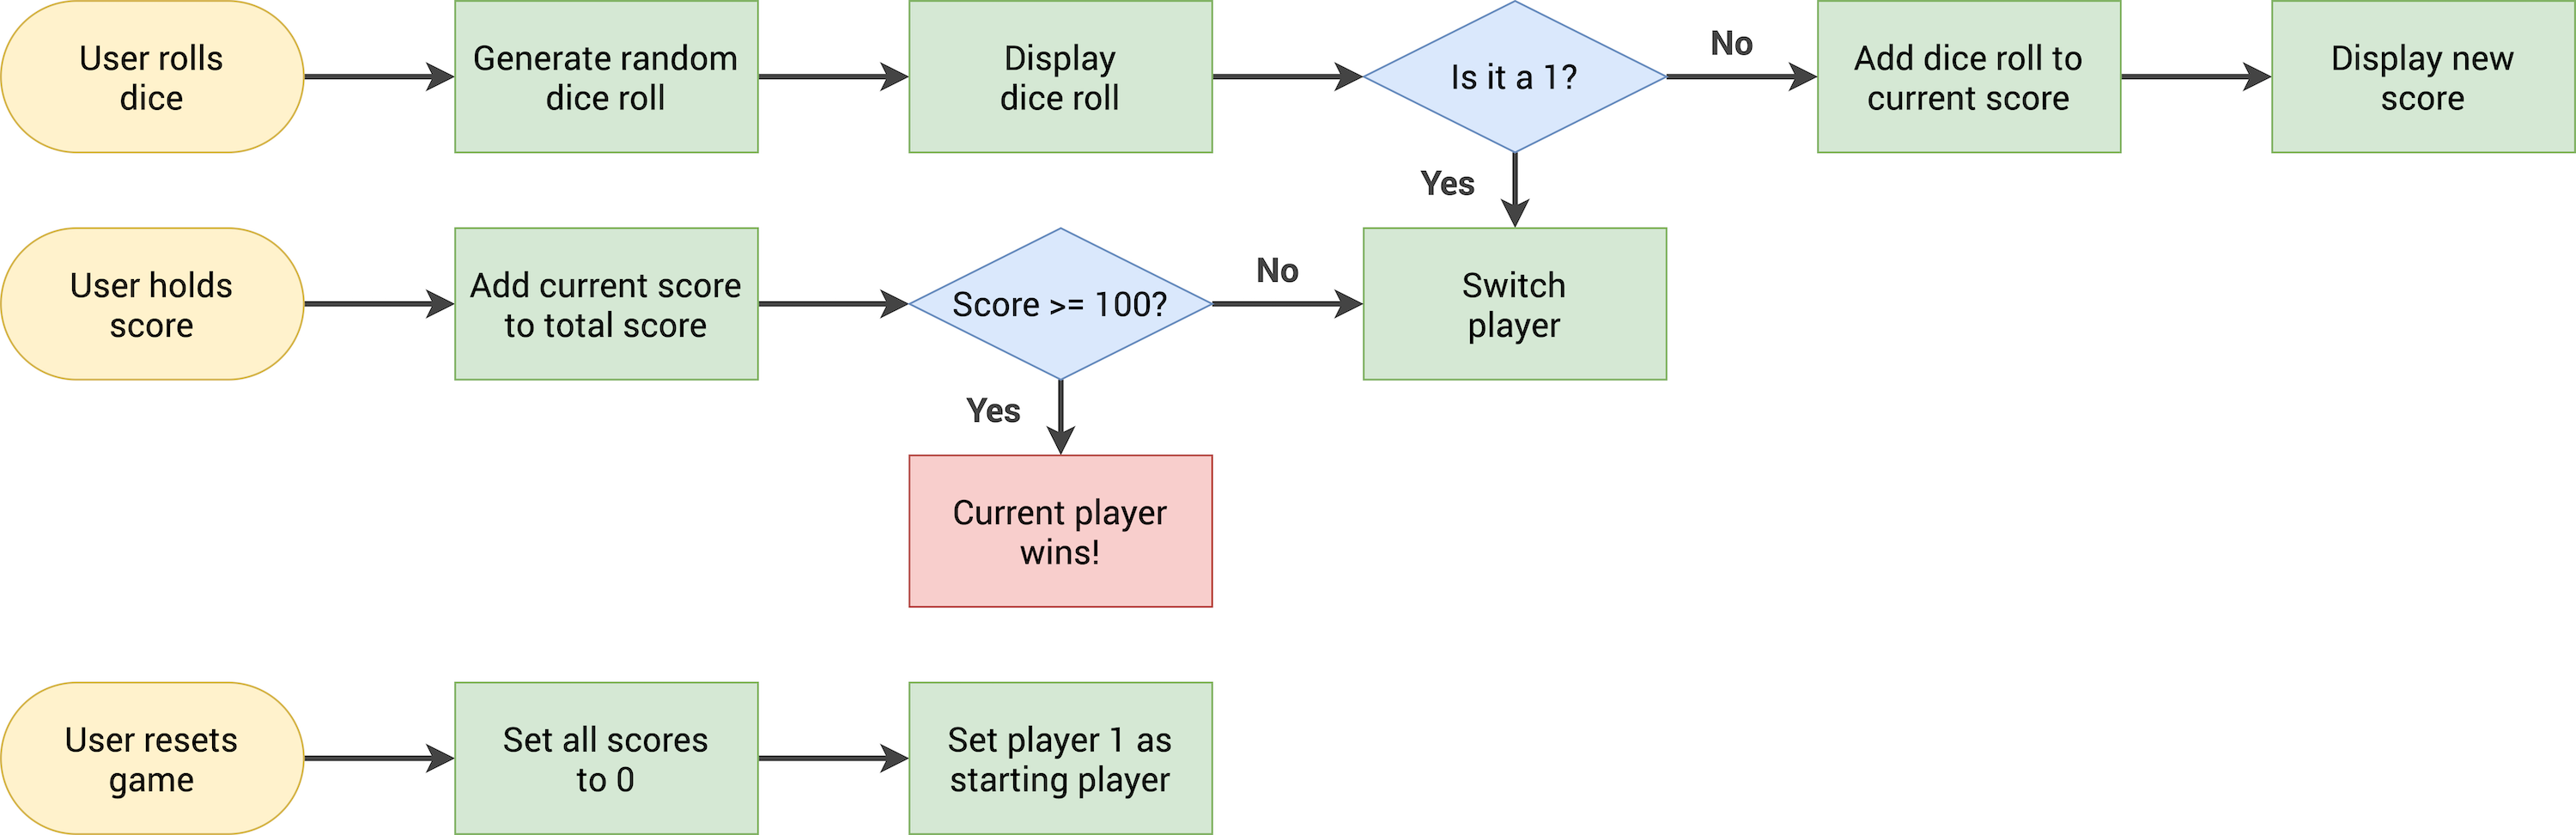
On the left side, we have the possible actions that the user can take in yellow. And then, from there, we see what happens in the application as one of these options is chosen, .i.e., executed.
So, whenever the user rolls the dice, .i.e. clicks that roll dice button, then we need to generate a random dice roll. We then need to display that dice roll and check whether it is a one.
If it's not one, then we add the dice roll to the current score and display it. If the dice roll is one, we switch the player. And so, in this case, the dice roll will not get added to the current score.
Next, the other option is that the user wants to hold his score. If that's the case, we add the current score to the total score. Once that is done, we must check if the score is above or equal to 100, because if you remember, a player wins whenever the score is at least 100 points. If it's not, we switch the player, and the game keeps on running.
Finally, when the user chooses to reset the game, we set all scores to zero and set the player number one back to the starting player.
Great! I think it was really important for us to have this kind of explanation and guide to start visualizing what's going to happen in the application we are about to code and how we will implement it.
So just as a piece of advice, whenever you build a project like this one or any other project, it's a good practice to start by drawing a flow chart like this. It doesn't need to be perfect right from the start. You can just start out with a rough sketch without the complete plan of what you're going to build.
To get started, you can download the starter files from this link. And as always, you will find the usual HTML, CSS, and JavaScript files. You will also find the images for the different dice faces.
Let's now start to write a little bit of code here.
So right now, if you open the app in your browser either using LiveServer or by opening the HTML file, this is how the application looks like:

We don't see the dice when the game starts in the demo, and we don't see any scores. So the first thing that we're going to do is put the scores to zero and make the dice disappear.
Below is the code from our HTML file were those initial values come from.
<p class="score" id="score--0">43</p>
<p class="score" id="score--1">24</p>
Now, let's take a moment to inspect our HTML because, as you already know, we need the class names and, in this case, also the IDs to identify and select the elements.
Below we have two sections, one for each player, and you can see that the first one is player zero and the second one is player one. In the next lecture, we will see why the players are called zero and one instead of one and two.
<section class="player player--0 player--active">
  <!-- HTML CODE -->
</section>
<section class="player player--1">
  <!-- HTML CODE -->
</section>
Like we saw above, we can also see that the scores are stored in <p></p> (paragraph) elements. Both of them have a score class but different IDs. So this time, we need to select these two elements using their unique ID instead (score--0 and score--1) of a class name.
// Selecting score elements
const player0ScoreEl = document.querySelector('#score--0');
const player1ScoreEl = document.getElementById('score--1');
From the above code you can see that I used two different methods to select our element: querySelector that we've always been using and the new guy getElementById.
The only difference in our usual querySeclector syntax is that instead of the dot (.) that we've always been using to get our classes, I used the hash (#) because that's the symbol for the IDs.
The getElementById is another way of getting an element with an ID from the DOM. You don't need to add the hash (#) symbol. It is considered faster than querySelector, but I guess that's only relevant if you're selecting thousands of elements at once.
Now that we've selected our score elements, let's set their initial values.
player0ScoreEl.textContent = 0;
player1ScoreEl.textContent = 0;
So if we save everything and go to your browser, you will see that the scores are set to zero.
Great! Now, all we have to do is to hide the dice. To do that, let's go into our CSS file and create a hidden class.
We can now go back to our JavaScript file and add that class (hidden) to the dice at the beginning of the game.
// We select the element
const diceEl = document.querySelector('.dice');

// We add the hidden class
diceEl.classList.add('hidden');
If you save everything again and go to your browser, the dice shouldn't be visible. You can also inspect the HTML in your browser, and you will see that the hidden class we added is present besides the dice class.
