const - JS | lectureJavaScript Fundamentals 2
Iteration - The for Loop
When we learned about the if-else statement, I mentioned that it is a control structure and that there are more control statements. Well, one of the other control structures is loops.
Loops are a fundamental aspect of every programming language because they allow us to automate repetitive tasks. Tasks that we have to perform over and over again.
Let's consider when someone goes to the gym to do weight lifting. Let's suppose this person does ten repetitions of a specific weight lifting exercise. This could be represented by doing something like this:
console.log('Weight lifting rep 1');
console.log('Weight lifting rep 2');
console.log('Weight lifting rep 3');
console.log('Weight lifting rep 4');
console.log('Weight lifting rep 5');
console.log('Weight lifting rep 6');
console.log('Weight lifting rep 7');
console.log('Weight lifting rep 8');
console.log('Weight lifting rep 9');
console.log('Weight lifting rep 10');
I guess you've already seen that this is not a best practice because let's imagine that we had 30 repetitions instead of just 10. What if we wanted to say change a specific word in the string? Then we will have to change that in all of them.
Doing this violates the DRY principle because we are repeating this text ten times and just changing the number in the string.
So instead of duplicating this text, we can create a loop and then write the line of code that we want to execute in that loop, and it will then run that code over and over again until we tell it to stop.
Let's now implement a for loop, usually known as a loop with a counter. Before showing you the code or structure of a for loop, you have to know that the for loop has three parts:
-
The first part is the initial value of the counter. Considering our gym example from the beginning, the counter will start at number one and go all the way to number 10. When writing down our counter, we are literally creating a variable, and you have to declare it with the
letkeyword because the counter will later be updated by the for loop. -
The second part is the logical condition that is evaluated before each iteration of the loop. That is, before each time that the code in the loop is executed. If the condition is true, then the next loop iteration will run, and as soon as the condition is false, the loop stops.
-
The third part consists of updating the counter, in our case (gym example), increasing the counter because if we don't, the counter will stay at the initial value we provided in the first part forever. So what we need to do here is to update the counter after each iteration.
To summarise all we just said with code, here is how a for loop is structured in JavaScript.
/**
 * initial value ==> rep = 1
 * logical condition ==> rep <= 10
 * updating the counter ==> rep++ / rep = rep + 1
 */
for (let rep = 1; rep <= 10; rep++) {
  // Code to be executed
}
Now that we know how a for loop is structured, let's use that to print the different repetitions we wanted at the beginning of this lecture.
for (let rep = 1; rep <= 10; rep++) {
  console.log(`Weight lifting rep ${rep}`);
}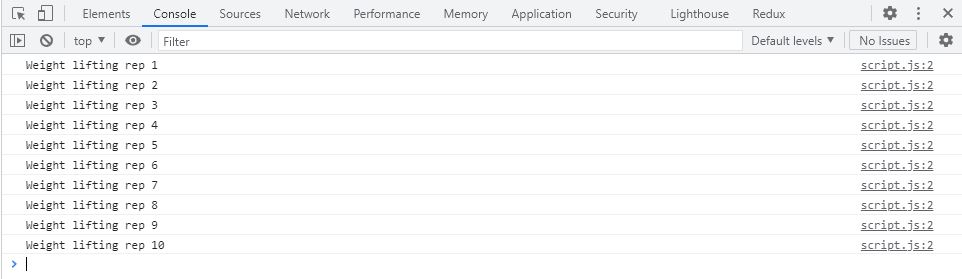
To finish, let's recap what we just did. We wanted to log our string Weight lifting rep... 10 times, and of course, it could be any other repetitive action. To solve this kind of problem of not having to repeat the same code repeatedly, we used a for loop with a counter rep initialized at one because that's where we wanted to start. Still, you have to know that a counter can begin at any number. After each loop iteration, the counter is then updated by 1 (rep++), which also updates the rep value in our string. The loop then runs while the rep counter is less than or equal to 10 (rep <= 10). So basically, what the loop does is keep checking if our condition (rep <= 10) is still valid, and only if it does will it keep running the loop.