const - JS | lectureData Structures, Modern Operators & Strings
The for-of Loop

Let's now talk about a new way of looping over arrays, which was introduced in ES6, the for-of loop. Let's say we wanted to loop over our entire menu from the restaurant object.
Let's start by creating a menu array that contains the starter and main menu.
const menu = [...restaurant.starterMenu, ...restaurant.mainMenu];We already know how to loop over an array with a regular for loop. And this means going through all the steps of setting up a counter, a condition, and updating the counter. That's a lot of work! And that's why we got the for-of loop now in which you don't need any of that.
It's so much simpler. Let me show you how it works.
for (const item of menu) console.log(item);
You can see from the above image that we get all our elements being logged individually. Let me now explain why it works and what this loop does. The for-of loop is called for-of because it is for and then item of the menu. So this loop will automatically loop over the entire array, and in each iteration, it will give us access to the current array element, which we can specify when building the loop. In this case we called item. You can call it anything you want.
Hence, if we simply log the current item down to the console, well, we get the result we had above. Each element logged one by one. Again, that's because, the item variable is always the current element in each iteration. Also, just like in the if-else statement, we don't need to create a code block when we only have one statement to execute.
That's pretty simple, and it's a really nice level of abstraction over the regular for loop. So we can do the same thing with this one, but without having to worry about all the underlying details such as counters and conditions.
What's also great about the for-of loop is that we can still use the continue and break keywords. And this is important because in future lectures, you will learn other ways of looping arrays, and in those, you will not be able to continue or break. So you will need to keep that in mind.
But now, what if we also wanted the current index and not just the current element? Well, it's a bit of a pain when we need that index in the for-of loop because originally, the for-of loop was just meant to give you the current element.
However, you can get both, and you will have to do it like this.
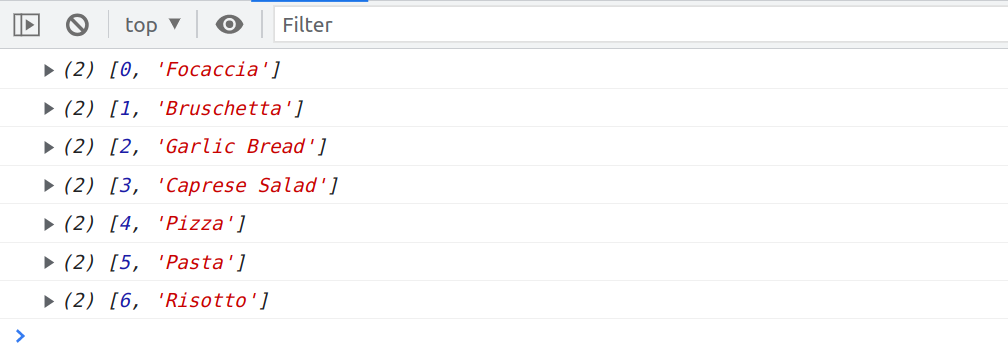
for (const item of menu.entries()) console.log(item);
From the above result, you can see that each item is now actually an array with the index in the array element itself. Let's quickly take a look at what this mysterious menu.entries() actually is.
console.log(menu.entries());
We get Array Iterator which is not really helpful. We will learn about iterators by the end of the course. But if we really want to take a look at this, we need to essentially expand menu.entries(), using the spread operator and then create a new array based on that.
console.log([...menu.entries()]);
We can see that it is basically an array, which in each position contains a new array, which contains the element (Focaccia), and index number (0) of that element in the original array. And so that's why we get, zero, one, two, three, four, etc. plus all of the original elements of the menu.
That's also the reason why we got the result we had when we used the for-of loop with menu.entries(). Because, at that moment, when we did for (const item of menu.entries()), menu.entries() was now an array where each element was now a new array ([0, 'Focaccia'])
So now if we wanted to print a nice menu, we could take advantage of what menu.entries() gives us.
for (const item of menu.entries()) {
  console.log(`${item[0] + 1} - ${item[1]}`);
}
Smart as we are 😏, and knowing that item is an array, we can directly destructure it. We don't have to take element zero and element one manually. That is the old-school way.
for (const [index, element] of menu.entries()) {
  console.log(`${index + 1} - ${element}`);
}